Skip to content ↓

Teaching and Learning Blog

By James Collins, Deputy Headteacher

Page 2

  • January Blog 2023

    Published 31/01/23, by James Collins

    What is the Big Question?

    The ‘Big Question’ is an innovative pedagogical tool, where instead of implementing a learning objective, a question is posed at the start of each component of learning. It is important that we share this question with the students, through our itslearning plans, so our students can get a full understanding of what they need to be able to answer by the end of this particular learning journey. There are many different research references to support this thinking which I have highlighted at the end.

    Good practice indicates that we should get the students to read and consider all key words within the question. After allowing time to think, students have the opportunity to discuss their initial thoughts with their peers. Once they have consolidated their ideas, they are asked to share what they think are the important words and what these mean to them. This can act as a quick and easy form of ‘Check for understanding’ (Assessment Reform Group, 2002), where the teacher can make initial amendments to the component of learning to address any misconceptions that had not been predicted.

    This dissection and analysis of the ‘Big Question’ helps to place responsibility on the students, allowing them to take ownership of this learning journey (Holligan, 2013).

    How is a big question different from an objective?

    The ‘Big Question’ allows the children to understand the success criteria. If they can answer the question at the end of the learning journey, they have been successful.  The children have the ability to take ownership of their learning journey as they work through the components as they build up to the fuller understanding of the ‘Big Question’.

    Let’s think back to our worked example in History- ‘Why did William win the battle of Hastings’. If we shared that question with the students at the start, and they discussed possible explanations, this should gain their interest and then start breaking down what they will be learning over the coming weeks. We then can then break this down into smaller components of learning based on what we need them to understand to get that fuller picture. The assessment at the end is based on the initial ‘Big Question’, so we can check learning at the end of the journey. Below is the link to the thinking template History used.

    https://crookhorncollege.itslearning.com/ContentArea/ContentArea.aspx?LocationType=1&LocationID=65

    When using a learning objective, teachers must generate their own questions within the lesson to support higher-order thinking. Research suggests that open-ended questions support higher-order thinking skills, but teachers tend to ask closed questions. Teachers can plan ahead using the ‘Big Question’, considering what further questions might arise as a result. Use of the ‘Big Question’ can facilitate teachers’ questioning skills, where an open-ended question can be used at the beginning of a component to initiate deeper understanding. We have encouraged this use of ‘hinge-questions’ to support our CFU points throughout a learning journey.

    How is the Big Question formed, and how does this lead to components of learning?

    There are several steps to planning the ‘Big Question’:

    Step 1: Consider the initial learning objective. What should be learned, and what is needed for this to happen successfully?

    Step 2: Identify knowledge children already hold which will allow them to be successful with this new component. An effective ‘Big Question’ will enable the teacher to make it clear to the children what prior knowledge they need to draw upon.

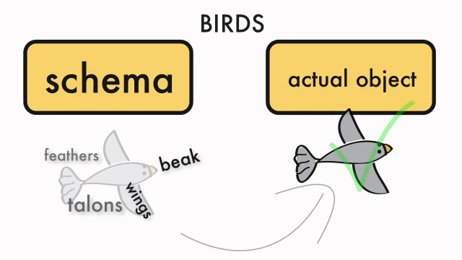
    Step 3: Establish the components children will learn and understand, building on the prior knowledge to introduce new concepts or content. For those of you who were here in March 2020, we talked about the idea of schema, and how to break up learning into components. The example below comes from a ‘Big Question’ – what is a bird? We would need to break this down into the components of a bird and how all these parts make up a bird. We can use this concept with any big question we are teaching.

    Once all these things are considered, a list of keywords (Tier 2 and 3) can be made and these form the structure of your ‘Big Question’ for that specific session.

    An effective ‘Big Question’ will allow the students to interpret what they will be doing within that session and how they can show progression from one session to another. Therefore, it is essential that the ‘Big Question’ incorporates all the key concepts and vocabulary that will be used throughout the component.

    The benefits of using the Big Question

    This use of the ‘Big Question’ will improve the use of dialogic within the classroom (Alexander, 2008). This produces a positive impact across the entire curriculum where talk is an essential tool for developing and articulating understanding across a range of attainment levels.

    Implications for future practice

     The ‘Big Question’ promotes ‘outstanding’ teaching and learning in accordance with Ofsted (2015). To name a few criteria suggested by Ofsted, outstanding teachers should use questioning highly effectively, identify common misconceptions, check pupils’ understanding and plan lessons very effectively. The ‘Big Question’ promotes and endorses all of these criteria, allowing for constant questioning that checks for understanding and misconceptions. This innovative pedagogical choice provides us with confidence that we are giving the students the best learning experience possible and that we are supporting them in developing key skills that they will need throughout the whole curriculum and later on in life. Having seen it in practice and having witnessed its impact on both the students and the teachers within College, we believe using the big question as the basis of planning is in the best interests of the students.

    References

    Alexandra R (2008) Towards dialogic teaching: rethinking classroom talk. 4th edn. York: Dialogos.

    Assessment Reform Group (2002) Assessment for Learning: 10 Principles [online]. London: Nuffield Foundation. Available at: www. aaia.org.uk/content/uploads/2010/06/ Assessment-for-Learning-10-principles.pdf

    Crossland, J. (2015) Thinking about metacognition. Primary Science, 138, 14–16.

    Dawes, L., Mercer, N. and Wegerif, R. (2004) Thinking together. 2nd edn. Birmingham: Imaginative Minds.

    Holligan, B. (2013) Giving children ownership of their science investigations is easier than you might think. Primary Science, 128, 5–8.

    Office for Standards in Education (2015) School inspection handbook [online]. Manchester: Ofsted. Available at: www. gov.uk/government/publications/schoolinspection-handbook-from-september-2015

    Read More
  • November Blog 2022

    Published 01/12/22, by James Collins

     Retrieval Practice

    Retrieval practice is not a new concept in education.   Teachers over many years have been working with the technique of getting their students to remember knowledge from past lessons.   Here at Crookhorn, we are now looking at best practice and how we can develop our retrieval skills - both as teachers in lessons and students studying independently.

    As part of the Developing Blended Learners Programme, we have considered both retrieval and revision and how we can upskill our students to get the most out of their working time.   Through discussions, we realised that staff have varied definitions of retrieval and revision, and this was a potential point of confusion for students and parents.   We have therefore come up with the following definitions:

    Revision:

    Going back over taught and learnt content, using previous and new resources, to ensure a secure understanding. 

    Revision materials:

    Concise and accurate documents that contain a clear summary of previously taught content.

    Retrieval Practice…

    “refers to the act of recalling learned information from memory (with no or little support) and every time that information is retrieved, or an answer generated, it changes that original memory to make it stronger. 

    The retrieval process cements the information in the long-term memory, which should enable that information to become easier to retrieve in the future.”  Kate Jones

    • is intended to be low (or no) stakes work
    • needs to have appropriate ease and challenge to allow to a high success rate (80%+)
    • can be used to close the vocabulary gap and support vocabulary instruction

    It is a common misconception that retrieval practice is just about learning facts.  Although it is easy to see why this is the case, the process of recalling information regularly supports the development of links within the long-term memory.  In turn, this allows students to be able to use this knowledge more effectively when working on new concepts.

    We need retrieval to be frequent and ongoing, not just part of revision towards assessments.   We need to build retrieval into every lesson as well as independent work.   An activity doesn’t need to be long, but the sequence of the activity needs to be carefully planned.  

    When in class, we need to be explicit with the students that this is a retrieval task.   We need to explain to the students the process they are going through and how they can use the same process as part of their independent work.

    For the past year, science have been using their ‘Blast from the Past’ sheets which have questions from various time scales in the past. 

    With this example, the class teacher should be explaining to the students the reasons for revisiting work from a year ago and not just focussing on the last lesson.

    The Developing Blended Learners Programme will be working with students to get them to consider their independent learning and revision process, but the more we can support this this in every lesson, the better working practice our students will have.

    Seneca is a great way for students to be given short sharp retrieval activities as homework.   Taking on board the idea of revisiting over time, a Seneca assignment can be built up of short sections from multiple areas of the Seneca ‘course’.  There is no need to complete all of once section of the ‘course’ in one sitting.  Careful planning and analysis of the results can ensure coverage of the whole curriculum across time and address weaker areas of knowledge.

    The retrieval practice definition shared earlier comes from Kate Jones’ book ‘Retrieval practice: Research and Resources for every classroom’.  This, along with book two, is available in the staff library and is an easy read, summarising the work of many practitioners – including Rosenshein and Sherrington on the Principles of instruction.  Jones has collected several retrieval techniques and I share a few with you here:

    Generic retrieval questions

      • State 3 facts from last lesson.
      • What keywords did you use or learn last lesson?
      • Ask your partner 3 questions based on the content covered this term.
      • Explain a key concept or idea from last week in your own words.
      • Discuss with your partner what we were studying in the lesson last week.

    Brain dumps

    Simply refers to dumping as much information from the brain about a specific topic

    Cops and Robbers

    A build on from brain dumps.   Once the initial brain dump has been completed, student read other students work and ‘steal’ other information

    Retrieval relay race

      • One question on a page, 4 empty boxes
      • Student 1 writes as much as possible in the 1st box
      • Paper is passed to student 2 who needs to add ‘more’ information to box 2 – this requires student 2 to read students 1s work before writing their own information
      • Pass on to student 3 and 4 accordingly
      • Can be done with all students on the same question or a variety of questions in the class

    Flashback Friday

    As an end of lesson task, students create a list of 10 questions based on the current content (with answers separately if you want).   They will return and answer these questions in a future lesson – answering their own questions or a peer’s questions as you see fit.

    Retrieval grids

    There are many different forms of retrieval grids – this one appealed to me the most.

      • Create a 3 x 3 grid (or whatever size you want)
      • Add a question / fact / keyword etc in each box
      • In lesson 1, student complete 1 box of their choice – they will opt for the one they know the best
      • Lesson 2 a second box is completed and so on.

    ‘Apart from the initial lesson, the students will know what they will need to retrieve next lesson, and they may decide in advance which they wish to focus on for the next lesson.  The fact that they were deciding to act on that in advance to be prepared in the lesson is brilliant and exactly what they should be doing.  Kate Jones

    Retrieval at Crookhorn

    SCIENCE

    Following the memory pedagogy training at the start of November, Sean has been working on a couple of ideas, one of which he shares here:

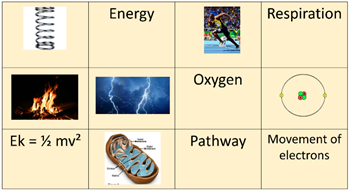
    Thinking inside the box!

    Make as many links as you can on your white board between these images.

    The purpose of these activities are twofold

    a) retrieval opportunity

    b) allow students to form their own dual coding - Also allowing you to see when they are unable to do this and therefore address any misconceptions.


    GEOGRAPHY

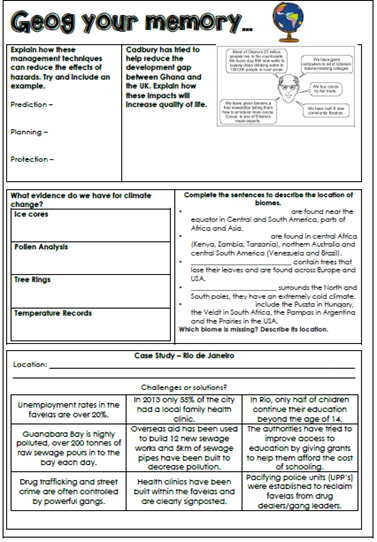
    Having considered the Retrieval Grids idea from Kate Jones, Barbara has amended the process of her GYM sheets.  

    Geography now complete these more often as their Do Now task, one box at a time. 

    Hopefully the students will begin to consider a little revision between lessons as they know what they need to work on in the next lesson.

    We’ll be able to share the update on the developed use of these sheets in due course. 

    We know there is good practice going on around the College and we would like to showcase more.  Please can you email AJB with examples from your teaching by the end of term.

    Read More
  • October Blog 2022

    Published 31/10/22, by James Collins

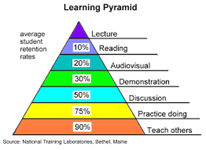
    I wanted to start this blog by thanking all teachers that Tor Flynn and I visited on the Friday before half term for our learning walk. We saw some excellent practice and I was delighted that we witnessed far more student discussion and engagement with student learning through talk than we had seen previously. From all the detailed and valuable research that has been carried out on the value of oracy recently, I keep coming back to the simple, yet quite old (I remember reading about this at university so it must be old!) learning pyramid about how best we all learn.

    It demonstrates that discussion, practising doing, and teaching others is by far the best way to learn something, and this is what we are seeing more in the classrooms.

    I wanted to share with you all some general feedback that Tor and I discussed, and what she has seen commonly across the county on all her learning walks. I also want to share with you what a student panel thought as well.

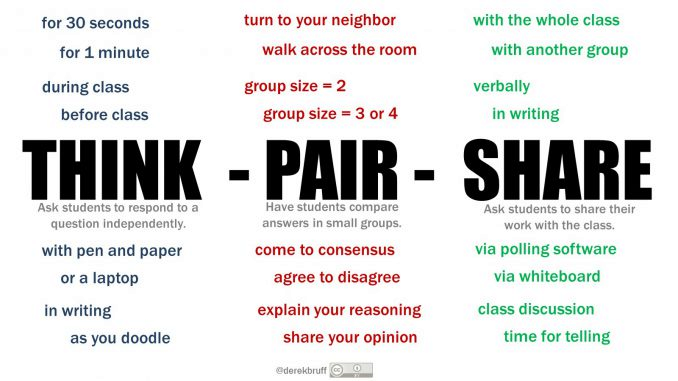
    1. With ‘Think, Pair, Share’ (TPS), we often rush the process. We need to slow down and let the students think. As practitioners, we don’t think the pace is quick enough if we just stop and let them think, so often speed it up and talk over the students whilst they are thinking.
    2. When it comes to the thinking stage, let them jot down their thoughts on whiteboards or in their books. You will be able to tell when the right time is to move on by just watching them. Have the mini whiteboards on the desk so they are easy to grab for the students. Tim has offered to send out a video of him leading a ‘TPS’ session this half term which I think will really help us.
    3. When using the whiteboards for a CFU, ask them to show the boards at the same time. If they are holding up their boards at different times, it can often be the case that students check what others have put up and then quickly copy them. It is also much easier to check that everyone has put up their boards and answer when they all raise their boards at the same time.
    4. What happens after your CFU? There are some times when we see some excellent ways teachers check for understanding but then nothing really happens due to it. The teacher ‘ploughs on’ with their plan. I have spoken before about the values of flexible teaching, or adaptive teaching, which I believe is even easier with our new classroom layouts. An example of flexible teaching could be the following.

    Teacher CFU on mini whiteboards and sees some students have not quite got the concept. Teacher sets up next part of the lesson, which is extending the thinking of the students who do understand. The teacher brings the students who do not understand the first concept to a table and moves the students who do get it to the now free seats. The teacher works with these students, and if there is a TA they can work with the students who are working on the extension task.

    Tor Flynn did a really interesting student panel with a selection of our KS3 students. Much of what they said backs up our own thoughts and observations of our oracy strategies. Their key points are as follows:

    1. Give us time to think! We often only have 10-20 secs which is nothing. Check both partners are contributing when walking around.
    2. Give us some examples of sentence starters to help us start off as this helps some of us.
    3. Teachers check our answers, but don’t do anything with this apart from ‘well done ‘or ‘that’s not right, think again’.
    4. ‘They need to know what we don’t know.’ Quote from Y8!
    5. Live marking really helps us.
    6. The key words help, but sometimes the definitions used by teachers are too fancy, using words we don’t know! It’s better when they put it in a context that we will understand.
    7. Lots of talking over us when we are working which stops us thinking!
    8. We recognise we are not confident in speaking in front of the class, and need help getting better at this.
    9. Each teacher or subject should actually ask us what helps us, through student voice.
    10. Teachers are using cold calling less, and more TPS but cold calling is still good if done well. Sometimes it is just used to check the ‘naughty kids’

    I think there is a lot for us to consider, but we are on the right path, and we all need to get into the right habits of doing this more in the classroom. Following on from the last point the students made, Doug Lemov (Teach Like a Champion) has written a blog about how to develop our questioning, and then getting students to think and respond to it through cold calling. This ties in directly to the points made above.

    GETTING ALL STUDENTS TO THINK HARDER WITH GOOD QUESTION DESIGN

    What makes a really good question? How do we ensure that we get as many students cognitively engaged as possible? And can subtle tweaks in the way you ask questions help your students feel more confident when they answer? Given that asking questions is the primary vehicle for Retrieval Practice, which continues to be one of the best bets for students learning, it is essential that we consider how to do it best. Lately, there has been a renewed interest amongst teachers for using a questioning method known as cold-calling, which is when a teacher solicits an answer from a student who hadn’t raised their hand to answer the question.

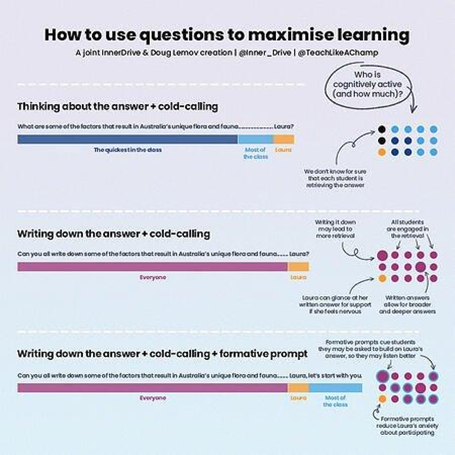
    This blog (and the downloadable graphic below) looks at three different approaches to using cold-calling, with each one tweaking the structure of your question and building on the last…

    THINKING ABOUT AN ANSWER + WAIT TIME + COLD-CALLING

    There are certain situations where it would be beneficial to have students think of an answer to a question (instead of writing it down). These may include for younger students who haven’t developed their writing skills, for example. This type of questioning is known in the research as “covert Retrieval Practice”.

    However, it is worth noting that when we ask students to think of an answer, if we tell them at the start of the question who we want an answer from, we subconsciously give the rest of class permission to switch off, as they know they are not going to be asked for an answer. As a result, they don’t have to recall the information and so miss out of the benefit of Retrieval Practice. In fact, it is likely that only the student you ask gains anything from it.

    By contrast, if we use the student’s name at the end of the question, we increase the amount of time the rest of the class are being asked to recall the answer. Despite the fact that they are subsequently not chosen, more of them have still engaged in this Retrieval Practice. This means both the students you ask the question to and the majority of the class are reflecting on the task for longer.

    Some worry that cold-calling can increase students’ stress levels, as the thought of being put on the spot can make them feel uncomfortable. This may well be the case if

    · it is not done in a supportive and inclusive environment

    · it was a one-off event

    However, evidence does suggest that being part of a classroom that repeatedly uses cold-calling can actually help students feel more comfortable in participating. So, make sure to use cold-calling often to make it a norm in your classroom.

    WRITING THE ANSWER DOWN + LONG WAIT TIME + COLD-CALLING

    Overt Retrieval Practice is where students write down their answer to a question. So, under the right specific conditions, why might having students write down their answer be a useful strategy? There are four different, but probably related answers...

    1. It helps ensure that all students are retrieving information – When students are asked to retrieve covertly (i.e., thinking of an answer), we cannot be 100% sure that they are in fact retrieving. For all we know, at any given time, students may be thinking about something else. 2. It helps the teacher asking the question to slow down and not rush their wait time – Given that there is some evidence that some wait-times are akin to the speed of an F1 pitstop, this could provide a very valuable strategy. Teacher self-discipline is a big factor in effective wait times, as it can be difficult not to jump in and solicit an answer too quickly. As it takes longer to write an answer than to say one, this helps slow down the whole process.

    3. Students can cover a broader range and larger depth of information – Due to the constraints of working memory, holding an answer in your head is always destined to be somewhat limited. Writing down their answer can help students mitigate this effect.

    4. Overt retrieval may potentially lead to a memory boost – If this was to be the case, it would be because of an increase in desirable difficulty, as well as utilisation of the Production Effect (which states that by producing something new with the information, students are more likely to remember it). However, it should be noted that the potential memory benefit to overt retrieval over covert retrieval is still relatively thin, with a clear consensus yet to be achieved. So, more studies are definitely needed (if you want to read some of the studies on this, you can do so here, and here).

    WRITING THE ANSWER DOWN + LONG WAIT TIME + COLD-CALLING WITH A FORMATIVE PROMPT

    A formative prompt is a sentence that encourages students to start the conversation. It gets the ball rolling and inspires students to share their thoughts. It can help reduce the fear of failure as perfection is neither required nor expected. It essentially lowers the stakes for the student being asked, and as such can reduce their anxiety of having been cold-called.

    Formative prompts also have a secondary purpose. By phrasing the sentence as “Laura, let’s start with you” it also signals to the other students that they have to pay attention to Laura’s answer: this is just the start of the conversation, and they may be called upon to build on Laura’s answer. This ensures higher levels of concentration.

    Formative prompts work best for open-ended questions. This is because formative prompts rely on students to build on each other’s answer. This would be difficult to do for factual closed questions. Therefore, you need to carefully consider the nature and format of the question you’re asking.

    FINAL THOUGHTS

    When asking questions in the classroom, getting your students to write down their answer, increasing wait times and using formative prompts are all strategies that, if done well, can increase student concentration, reach a sweet spot of desirable difficulty and facilitate richer classroom discussions. It definitely takes a bit longer to implement, but the learning rewards it offers make it a strategy all teachers would do well to have in their locker. This blog was co-written by Bradley Busch (InnerDrive) and Doug Lemov (Teach Like a Champion).

    Read More
  • September Blog 2022

    Published 29/09/22, by James Collins

    Following on from our Teaching and Learning Blog in May (https://www.crookhorn.hants.sch.uk/blog/?pid=20&nid=7&storyid=301) where we discussed oracy in the curriculum, I wanted to share with you some more thoughts on one of our key pedagogical tools which is ‘Think, Pair, Share’. In this month’s blog, I will discuss in more detail what this strategy is, and how this can be used successfully in the classroom. Our coaches we will be working with you throughout this term on developing your practice, so please discuss with them your progress so far, and what you need to work on to develop this further.

    What is it?

    Think-Pair-Share is a cooperative learning approach where the whole group is given a single question or prompt to discuss. Students consider the question individually for a few minutes before forming pairs to discuss their responses. Finally, they share their thoughts with the wider group, be it the table they are on or the whole class.

    Why do it?

    A major benefit of Think-Pair-Share is the wait time. This initial phase of silent thinking is a crucial opportunity for students to retrieve their prior knowledge and organise their thoughts. This in turn promises to improve the quality of the subsequent discussion and increase participation in the ‘Share’ stage. We know as professionals we often skip this ‘thinking’ stage or rush it, as we are worried about the silence or the pace of the lesson.

    The structure gives every student a low-risk opportunity to formulate a response and rehearse expressing it to one other person before ‘going public’. In this way it promotes the equal participation of every student.

    It potentially exposes students to points of view and approaches which contrast with their own and bring new perspectives. Our new classroom layouts really support T-P-S, and we should be generating more on task discussion as a result of the group based learning.

    How to set it up

    1. Before the session, develop a stimulating open-ended question (this should be part of your ItsLearning plans) – have a go at responding to it yourself – and prepare materials such as slides, as needed.
    2. During the session, introduce the Think-Pair-Share activity, including the hoped-for-benefits.
    3. Pose the question and ask students to spend a few minutes thinking about it individually, jotting down some notes and preparing their response. They can note this down on their mini whiteboards to lessen the fear of getting it wrong.
    4. Next, ask students to pair with another student and share their responses in turn for a further few minutes, noting similarities and differences. If they disagree, encourage them to summarise each other’s positions so they can explain why and how. You may ask them to integrate the ideas into a joint response for the ‘Share’ stage. Let students know whether you will be calling on every pair in the ‘Share’ stage, or inviting volunteers.
    5. Finally, invite the pairs to share their responses with the table or with the whole group. It doesn’t always have to be just discussion. They could share their ideas via a classroom thread on ItsLearning, or a poll you have set up. They could share by writing  paragraph and then sharing these with the rest of the group.

    Considerations

    We know at Crookhorn we have seen a decline in the students’ level of oracy. This may take time to build back, so don’t feel dejected if it doesn’t work straight away.  If the room and group size allow, consider intervening to allocate students into pairs of your choosing. This will give them an opportunity to get to know others outside their social network. As well as helping them bond, students are likely to encounter new perspectives and approaches.

    If students start chatting immediately, do emphasise the value of that first silent individual ‘Think’ phase. It gives students the opportunity to retrieve what they know and organise their thoughts about the question, both of which are central to learning and improve the quality of the discussion.

    The quality of the conversation will be affected by the difficulty or sensitivity of the question, and the extent to which students feel comfortable making mistakes.

    Variations

    Stump your partner‘ is based on an idea from the Centre for Teaching Innovation at Cornell University for consolidating learning from that session’s objective, reading, or other didactic material. For the ‘Think’ stage, ask students to individually and silently come up with a question to test their partner and help them to learn. Instruct students to try to stump their partner with a challenging question, but to keep it based on important concepts from the lesson or reading. For the ‘Pair’ stage, ask students to turn to a partner and pose their question, followed by a discussion of the responses. Finally, for the ‘Share’ stage, collect the questions to get a sense of what students find central and/or challenging.

    How to know if it works

    Compared to whole-group discussions without the Think or Pair stages:

    • Is there more equal participation? What proportion of students are participating in the plenary ‘Share’ stage?
    • Is there any change in who participates in the ‘Share’ stage e.g. quieter students, students from under-represented backgrounds?
    • Is there any change in the quality of the contributions e.g. is there difference in knowledge or sophistication; how productively are students engaging with differences of viewpoint?
    • Does the nature of the question affect the participation?
    • Do students find the activity helpful?

    Examples

    • In Mathematics, Ariana Sampsel’s (2013) small-scale action research project found that students’ explanations became longer, giving her more feedback about their thinking.
    • Lange, Costley and Han (2016) deployed Think-Pair-Share to make students’ language use more meaningful and improve their acquisition. They found students gave fuller responses and participated more equally compared to an alternative technique. They attributed this to the structure and wait time.
    • In Engineering, Janet Rankin explains how it can work.

    I hope you have found this blog useful and there are some hands-on strategies you can use. If you have any questions or feedback, please do share this with your coach. This is a very powerful way of developing many different attributes within our students.


    Read More
  • June Blog 2022

    Published 04/07/22, by James Collins

    Mixed Attaining Teaching Blog – The Sequel.

    Part 1 of this Mixed Attaining blog focused primarily on “The Learning Journey” – a fundamental tool in not only mapping out the intended learning outcomes for students, but what prior knowledge needs to be considered, revisited and embedded for all student groups before moving on. As teased within the first blog on this subject, there are a number of other techniques, concepts and strategies which can be implemented, and which can work hand in hand with having a solid, well-thought-out learning journey in order to promote progressive learning within the mixed attaining classroom.

    So, now you’ve hopefully had chance to digest, consider and maybe even implement some of these ideas relating to the learning journey, much like a long anticipated follow up to a summer blockbuster hit, here is the Mixed Attaining Teaching Blog – The Sequel; a summary of further teaching strategies that can help elevate the learning and teaching for all pupil groups within a mixed attaining classroom.

    1. Task design and differentiation

    Using the same Year 7 Maths example from the previous blog, within the key skills/knowledge section (which represents the bulk of the learning journey), tasks need to be progressive; allowing students of all attainment levels to work through and embed, apply and then challenge their learning. One way of doing this could be to allow students to choose, or for you to set them off at, different starting points; middle / higher attainers could complete tasks relating to the orange or green concepts (which should be easy enough for them to complete independently, whilst still providing opportunity to stretch and challenge). The class teacher is then available to explicitly teach the LA [lower attainers]. Also, in those classes where addition adults are available, a ‘helicoptering' technique can be used just to check in specifically with any MA [middle attainers] who may need additional support as they progress through, linking to what we will later explore as flexible grouping.

    Whilst differentiating tasks could appear overwhelming and contribute to a growing workload, one possible solution to this would be to make small adaptions in content. Again, using maths as an example, if all students are completing a task on finding a percentage of an amount (without a calculator), the higher attainers may do this with numbers such as 27%, which would require you to partition in a number of more complex ways, along with additional steps, whilst a child working below this level, may only need to find 20%. Here, the concepts hasn’t changed, nor has the expectation of what they are doing, but the values they may need to partition or manipulate would be more within their remit, allowing them to concentrate and develop their understanding of the concept taught, rather than the numbers or the context used. In English or curriculum subjects, this may look like removing or simplifying certain words which need to be read, so as not to change the meaning, but to reduce the level of reading skill required, should that be the student’s barrier to their learning.  All adaptations and tweaks should just be enough to relieve the cognitive load, but maintain the essence of the concept being taught. Also, these adaptions, whilst widely done to remove barriers for lower attainers in the class, will actually support all students, and remove that ceiling of what teachers or other students believe either they or others can achieve; everyone is learning the same thing, though maybe just accessing it in a slightly different way. Not only does this then promote a positive mindset, through this model, all students have had the chance to progress further and deepen understanding, with HA / MA perhaps doing this more independently and with the opportunity to access deeper thinking/reasoning tasks, whilst the lower attainers are able to have explicit teaching, catching them up, ready to progress with the rest of the class. Lower attainers may not progress onto orange or green concepts within that lesson, but they are now included in the same learning journey, and able to apply this knowledge as the learning journey continues.


    2. Flexible grouping, Live marking and levels of scaffold.

    Differentiation and different starting points is one thing, but to really elevate their effectiveness, it is evident that the role of the teacher is crucial. As teachers, we are the most valuable resource in the classroom, so plan yourself into your lessons!

    Live marking (whilst also reducing the work load of marking after a lesson) allows for immediate feedback and misconception addressing within the lesson. ‘Checking for understanding’ (CFU) tasks within lessons can greatly contribute to recognising those children who are struggling, along with those children who could be stretched further. Questioning, along with when questions are asked, should be considered early in the planning stage of a learning journey and used to stretch and challenge, assess understanding, but also pre-empt misconceptions. If you are able to recognise, but also plan for these misconceptions, teaching is more targeted and effective. Consider when you will work with certain students or small groups of students. That is not to say that you only work with certain children for the duration of a lesson, but to split your lessons up and recognise when and where your support would be most helpful. For example, you may need to spend 10 minutes supporting a LA group during a ‘Do Now’, warm up, or even ‘responding to marking’ tasks, allowing them to ‘peel away’ and work more independently as they gain confidence and understanding whilst embedding and securing knowledge the rest of the class already demonstrate. Once working independently, this could then provide an opportunity for the teacher to move to live marking work completed by MA/HA to see how they could be extended. As learning moves into the main bulk of the lesson, teachers would move on to delivering to the whole class, using questioning to decipher who may need support, and as students are set off to complete more independent work/practice (which could be differentiated in the ways already explored), the teacher would prioritise working with those students identified. A further positive to the teacher frequently working with different groups of children based upon immediate recognition of need is that it creates a culture ofany and all students can and will be worked with throughout a lesson’, thus creating an inclusive working environment. It again eliminates the ceiling of what each child believes they can do; working with an adult is no longer considered something only someone/the group who is struggling does.

    The level of support each student my need will also differ. Even though we may identify students as either lower attaining, middle attaining or higher attaining, we know that this could be for a variety of different reasons and that no two students are alike. The level of scaffold (Rosenshine) therefore also plays a key factor, not only in teaching and clarifying concepts, but allowing children to learn from teacher feedback and progress; teachers or the supporting adult is not just repeating the same models, but encouraging the child to develop and build up understanding from these models.

    Self scaffolding is more suited to those HA’s or those confident in topic who are encouraged to check their own work and recognise mistakes. Adult may just direct to ‘check this’.

    Prompting relies on the supporting adult drawing attention to a misconception, but limits the scaffolding. Phrases such as ‘Can you explain your thinking here?’ allows a student to develop their reasoning more and encourage self-correcting before the self scaffolding stage.

    Clueing allows the supporting adult to be more direct in pointing out a misconception, but again, limits the information given to fix it. Phrases and examples such as “this part here doesn’t look right – what do you know already?” or for example, providing alternative homophones when a spelling is incorrect for a student to decide which one to use.

    Modelling allows the supporting adult to model a method within a similar task for the student to learn from and apply to their own work / misconception.

    Correcting occurs when the student repeatedly makes the same mistake and needs work corrected and explained the misconception in more detail. Once corrected, the supporting adult should provide one or two further, similar questions to check understanding / misconception has been addressed.

    3. Resources to reduce the cognitive load.

    Willingham discusses ‘cognitive load’. If information is in our long term memory (e.g. multiplication facts, spellings/spelling sounds, continents/countries, dates etc), then problem-solving using these facts will require less of a ‘cognitive load’ (essentially less brain power) than if these facts are only in our short term memory. Warm up sessions and ‘do now’ tasks can not only provide opportunity for children to either deepen knowledge or develop it, but as an opportunity to commit these concepts to our long term memory. Stanislas Dehaene’s research goes on to support the use of spoken language and verbal tasks in helping facts being stored in our verbal memory, which can be beneficial to all students, but particularly for SEND or those with reading/writing barriers to learning. Tasks where saying (and hearing) the sound pattern of the phrase, and stem sentences are important, and so should also be considered in the tasks teachers are asking students to complete, and could again be something teachers think about when trying to differentiate or create progressive tasks for students.

    For some SEND, trying to commit something to memory can present its own problems. Therefore, recognising what the key element of learning is, and how you could lighten the cognitive load in achieving that can really make an impact. Having word banks, significant words or equations, diagrams etc available to students, so long as this wasn’t the key element of learning you wanted to teach / test, would help free up the cognition of students (and then could later become fluency or do now tasks in later lessons to help embed.)

    Further, examples:

    • An English lesson focussing on text analysis – How does the author create a sense of danger… - could be supported by word bank of synonyms. For those HA students who perhaps wouldn’t need a work bank, they could still be given one, with some red herrings thrown in, allowing for a reasoning and deeper thinking opportunity where they would need to explain why some words would be more appropriate and effective than others. Additionally, for MA, this would provide an CFU opportunity; checking that they understand the meaning of specific words, as well as potentially broadening vocabulary. 
    • A maths lessons on Pythagoras could be supported by word mat of squared numbers / square roots.
    • A science lesson which requires table / graph plotting could be supported by table / axis already drawn. This could be further differentiated by having more or fewer things, such as titles and/or scales, already populated.

    Other possible resources; word mats, word banks, pre-drawn tables, times tables grids/facts, number lines, working walls with relevant information, or which has been put up as a result of class discussion etc.

    I recognise that there is an awful lot of ideas, theories and information to digest here, but I can’t stress enough that it only takes the smallest adaptation in your classrooms for all of these things to have a chain reaction; what looks like a mountain of work, only needs to start from one, well-thought-out idea or adaptation, and the rest naturally develops over time, so long as you recognise what you want to achieve next. If there is anything you would like to discuss further, whether its help designing or adapting tasks, clarifying a concept, or just to get more information, please do not hesitate to ask!

    Read More
  • May Blog 2022

    Published 04/07/22, by James Collins

    Children should be seen and not heard was often something I heard when growing up. We’re taught that silence is golden, which in some situations it truly is, however for some children, silence is becoming the norm. There is a growing sense that this pandemic has caused many social issues, and one of these is that children have regressed in terms of their discussions and ability to talk to adults or peers.  With the inability to express their thoughts, feelings and opinions with confidence, too many children are locked in semi-silence. We need to develop the teaching and learning of Oracy, so all students develop their confidence in their own voice.

    What is Oracy?

    Oracy describes the speaking and listening skills needed to be a good communicator, it intends to give spoken language the same importance as ‘literacy’ does to reading and writing. It’s about having the vocabulary to say what you want to say and the ability to structure your thoughts so that they make sense to others.

    Why is Oracy so important?

    To be able to communicate with each other is a life skill, and something that we believe our children need in their future careers. If this Oracy development is not supported in schools, this might affect children’s future life chances.

    Evidence found that children who struggle with language or have poor vocabulary at age five are:

    • Six times less likely to reach the expected standard in English at age 11 than children who had good language skills at five.
    • Ten times less likely to achieve the expected level in Maths.
    • More than twice as likely to be unemployed at age 34 as children with good vocabulary.
    • Twice as likely to have mental health difficulties, even after taking account of a range of other factors that might have played a part.

    The impact of Oracy is clear. We know the gap between the disadvantaged students and those who come from advantage is widening, and if we must do a range of measures to narrow this gap.

    A number of organisations have developed resources that explore curriculums for Oracy, including Voice 21, whose Oracy framework is depicted here:

    What can we do to improve Oracy here at Crookhorn?

    1. Develop the effective use of ‘Think-Pair- Share’. The coaching team will work with you on how this is used in class. We will work with you on developing the think time, as this is often rushed and overlooked. Getting students to really think through what they want to say, and jot down some points is key. We also need to consider how to conduct the ‘pair’ stage. The share section does not need to be a whole class discussion but in groups. Teachers need to build adequate time in for this into some lessons and to enable meaningful learning from the talk.   
    2. Consider the use of Cold Call- and how this is used effectively, so it builds confidence and is not used as a tool for terror! Teachers to plan questions specifically, and plan for who will answer these questions. 
    3. Our student council are currently discussing some ground rules they would like implemented when having a group discussion. These will be distributed to all staff this half-term to be promoted in the classroom and for us to follow when students are discussing issues.
    4. Make time for Oracy: Time is needed above all else. Although timetables are already filled to the brim, think about where there might be chances to teach Oracy. You may be able to find time to teach Oracy explicitly as a standalone lesson, however even if you plan in opportunities for Oracy into other curriculum areas, this will make a difference.
    5. Give opportunities to practise Oracy: Children need as many opportunities to use their Oracy skills as possible. Think about the amount of time you give children for discussion and the structures you use – can you change your approach to encourage Oracy? When you talk with children, do you always question or do you comment and prompt? Do you build upon what children say? Think about how often children are given opportunities to report orally, both planned (e.g. presenting research) and unplanned (e.g. How did your group find that?)
    6. Have high expectations for Oracy from all: Being a good role model for Oracy is crucial. Just as using your thinking voice is an important tool for developing children’s metacognitive skills in Writing, so it is for Oracy. Verbalising making Oracy choices and thinking about the most effective way to phrase speech is key to supporting development. Feedback about Oracy is also helpful. If a child says something incorrectly, rather than focusing on their mistake, repeat what they said back to them using the correct phrasing. For example, if a child asks ‘Can I toilet?’ say ‘Please can I go to the toilet?’ back. Where possible, praise and give feedback on speech specifically, even when Oracy is not necessarily your objective or main focus. For example, ‘I think the way you explained that had a really clear sequence.’
    7.  Have fun with Oracy: Enjoy debates, performances, role play and games together, where Oracy takes centre stage. A whole range of ideas can be found on our webinar recording discussed below.
    8. We are going to release 10 key Tier 2 words every term, and will ask you to consider how these words are used in your subject and plan in when you can cover them in your lessons. We have worked with a selected group of subjects this term (RE/History/English/Science/Geo) about which Tier 2 words are used frequently and asked the staff to explain what these words mean to the students and how they can be used. This is to be planned as an Oracy task at some point during a lesson. We could teach these words in a variety of different ways, and we have noted some ideas in a Power Point in the literacy folder in itslearning.

    https://crookhorncollege.itslearning.com/ContentArea/ContentArea.aspx?LocationType=1&LocationID=65

    Read More
  • April Blog 2022

    Published 03/05/22, by James Collins
    Mixed Attaining teaching blog I think one of the biggest misconceptions in preparing for and teaching a mixed attaining class, is the idea that you should focus on the lower attaining children and try to pull them up at the expense of the middle and
    Read More
  • February Blog 2022

    Published 28/02/22, by James Collins

     Blended learning protocols: how these support SEN students with a particular focus on Year 10

    We started our main Blended Learning journey in the spring term of 2020, way before we had even considered what the effect that a global pandemic would have on education.  As we come out of all restrictions, now seems an appropriate time to revisit our Blended Learning Protocols and develop how they now fit into our everyday teaching ethos, rather than being something to support learning during the pandemic.

    Our protocols themselves remain unchanged, with just the removal of 4b – the section that refers specifically to students isolating for COVID reasons.  The protocols can be found in the Curriculum planning folder in the itslearning Staff Room:  LINK

    In the November Blog we revisited and explored some of the main CFU activities that we can use in the classroom and as part of our day-to-day teaching:  LINK

    Since writing that previous blog, SLT have revisited several key documents on the subject of planning and SEN provision, including Barak Rosenshine’s Principles of Instruction and Hampshire’s SEN Support Guidance for Schools.   Both of these documents are vital reading when we consider our planning of the curriculum and also when we consider individual lessons, so we can support all learners to make progress inside and outside of the classroom.

    BL protocol 1: All plans are to be on itslearning and bespoke to individual classes

    We will all agree that the makeup of all classes is different and changes constantly.  Therefore, we need to consider this individual makeup when planning lessons.   The ability to collaboratively plan and share lessons through our itslearning mastercourses has had a notable impact on the quality of planning that departments are doing; however, these planned components will not be suitable for all classes to follow at the same speed in the same way.  Review notes support our understanding of the progress of a class and where things need to be amended.   We should also be adapting and adding in activities as suited for our individual classes and students.

    Review notes also help in the longer term.  When planning an upcoming year 9 topic recently I was able to review the notes I made last year. I had identified the issues that the students were having, and therefore I was able to adapt the component plans appropriately this year – I await the results of these developed plans but have the strong belief that they will improve the students understanding.  I know Barbara has also used the review notes to help plan the same topics next year- a great way to use the note section. 

    In recent monitoring I saw the following review note in a Spanish lesson – clearly identifying the issue that the lower attaining students are having.  This can be used for reflection in the coming weeks and addressed in planning for future cohorts.

    BL protocol 1: All plans … ensure that future learning links to or builds on the learning from the previous lesson.

    Extracts from Rosenshine’s Principle 1:

    The most effective teachers in the studies of classroom instruction understood the importance of practice, and they began their lessons with a five- to eight-minute review of previously covered material

    Over the past few years, we have worked hard at certain pedagogical practices.  The ‘Do Now’ Task is embedded into lessons well, but are we using this time effectively in all of our lessons? In Rosenshine’s research, he suggests that this time is best suited for review to strengthen previous learning rather than the introduction of new concepts. This concept of over-learning is essential for many of our SEN students, who need constant revisiting of content in order to comit this information to their long-term memory.

    BL protocol 2: The activities … must be explicitly clear with the task that is to be completed.

    SEN Guidance Section 6.3:

    • Curriculum provides opportunities for repetition, over-learning and consolidation of skills at an appropriate level
    • Strong emphasis on meta-cognitive approaches e.g. how can you help yourself remember this
    • Use of strategies for scaffolding of literacy- based tasks e.g. writing frames, sequencing, cue cards and highlighting.

    Chunking and scaffolding.  Again, two term that we are all familiar with.  Are these planned well into our components of learning?  

    In the example plan here we see opportunities for students to rehearse and go over learning several times and the teacher has built in several opportunities for live feedback to individuals and pairs.

    Breaking down tasks in this way with a numbered list helps it to be simple and clear and aids SEN students in seeing exactly what they need to do for each part. Instructions here are kept short and simple.

    BL protocol 3:  …independent learning (homework) 

    … can be planned as small CFU tasks such as self-marking tests.

    … can be response to feedback that might have been given on an itslearning assignment.

    Extracts from Rosenshine’s Principle 6:

    Effective teachers also stopped to check for student understanding.  They checked for understanding by asking questions, by asking students to summarize the presentation up to that point or to repeat directions or procedures, or by asking students whether they agreed or disagreed with other students’ answers.

    Another reason for the importance of teaching in small steps, guiding practice, and checking for understanding … comes from the fact that we all construct and reconstruct knowledge as we learn and use what we have learned.  We cannot simply repeat what we hear work for word. 

    Extract from Principle 7:

    It is important that students achieve a high success rate during instruction and on their practice activities.  Practice, we are told, makes perfect, but practice can be a disaster if students are practicing errors!  If the practice does not have a high success level, there is a chance that students are practicing the learning errors.  Once errors have been learned, they are very difficult to overcome.

    A low stakes self-marking quiz gives students a high success rate.  The same quiz can be used several times through the course a of topic to reinforce understanding.  Itslearning has the option to randomise question order and the order of answers within a question.

    BL Protocol 4: All main CFU or formative tasks are to be put on itslearning as an assignment or task. These should be planned into the sequence of learning.

    Feeback that is specific and formative have a hugely beneficial effect on students, particularly SEN and LA students. Action based comments, with learning questions, are vital to moving a student's understanding forward. With feedback for SEN, ensure that the action point is specific and clear, so they know exactly what needs to be done. Be sure to all time for student response.

    BL protocol 5: Additional resources can be added in over time, to allow for greater depth. Think about extra resources such as a week-by-week revision guide.

    Read More
  • January Blog 2022

    Published 01/02/22, by James Collins

    We often talk about the need to improve ‘student independence’ at Crookhorn. We also talk to our students about the benefits of being independent, as part of our OPEN MIND philosophy.  We need to develop habits that, once embedded, will enable students to respond proactively and positively to any challenge they might face. By creating learners who are in control of their own education, we also create young adults who will continue to be independent thinkers in their lives beyond the classroom. This is our job, and we must teach in a way that allows room for independence without sacrificing those all-important results. But to create a more independent learning environment we must first start by adjusting the mindsets of everyone in the Crookhorn classroom − students and teachers alike! I want to cover some strategies that I think we should all try and work with our coach on to develop good habits in the classroom.

    Changing mindsets

    1. Learning from failure (OPEN MIND-Make mistakes)
      One of the major obstacles preventing students from becoming more independent is a fear of failure. To encourage a more independent approach, we must help students to see failure as an opportunity to learn, rather than something to be avoided at all costs. Be sure to praise students for trying even when they make mistakes and praise them further when they demonstrate that they have learnt from what they have done wrong in the past.
       
    2. Praising persistence
      Effort and persistence can help any student to make great progress regardless of their starting point. While it is important to praise any examples of independent behaviour, you will really reinforce the importance of trying hard by praising the effort that a student makes above the final product of their work. As a result, students will be more likely to keep trying when they encounter difficulties. They will also believe that with enough effort they can always make progress, no matter what they are faced with. So true for our SEN students!
       
    3. Minimise teacher talk
      In every lesson, there will be moments when the teacher needs to stand at the front of the room and address the whole class. Although sometimes necessary, these periods of teacher talk should be kept to a minimum, allowing for other forms of engagement that require greater levels of independence. This is something I know many of us are working on, including me, as Pam Jones who has coached me recently will tell you.  
       
    4. What it means to be independent
      It is important to discuss with your class what it means to be independent in the classroom. While you might have a clear idea about what independence looks like, your students are likely to be less certain. Through a class discussion, devise a set of characteristics that define someone as independent and identify specific examples of classroom behaviour that demonstrate these characteristics. This may involve drawing attention to examples already being exhibited in the work or actions of students in the class. Recap on this at regular intervals.

    Teaching tools

    1. Include all necessary information
      When creating handouts or presentation slides that relate to a task, help students to be independent by ensuring that you include all the information that they will need to successfully complete the work. Teaching through the itslearning plan will show them where the resources are, so they can access them independently. While they are doing so, you can circulate to assess work, provide assistance where absolutely necessary or use questioning to challenge students’ thinking.
       
    2. Reusable checklists/flow charts
      Checklists/flow charts are a great tool for promoting independence because they provide students with the means to make judgements, assess what they have done and deal with various queries without asking the teacher for support. Please liaise with the SEN department who will help you with this. The clear layout of activities in itslearning can be seen as a checklist- so highlight these to students who are accessing their plans through itslearning. In RE, we are being encouraged to provide these for our SEN students to give them clear tasks for them to complete over a period of time. If you need a template, see SEN or myself.
       
    3. Helpful learning walls
      We have done lots of work on our learning walls, and this is something we should revisit within departments every term. They can be a brilliant aid to independence; they offer an alternative point of reference to help students deal with questions or problems relating to their work. Directing students to check the learning wall when they have a question will encourage them to search for answers independently before they ask for your help.
       
    4. Set up a reference corner/itslearning resources
      To make sure that students always have a place to go when searching for answers, designate an area of your classroom (or itslearning!!) to be the “reference corner”. Within this area you should make available a selection of reference works. This might include general reference books such as dictionaries, thesauri, encyclopaedias, grammar guides and handbooks of equations. You may also choose to add text books or books relating to a topic you are currently studying. Kate Humby in the library is available for support in creating digital content.
       
    5. Training in thinking techniques
      Taking the time to train students in problem-solving and thinking techniques will provide them with a go-to structure that can be applied to difficulties encountered in the classroom or when completing homework. The techniques you introduce might be as simple as learning to organise thoughts through mind-mapping, lists and diagrams. Whichever technique you decide to use, it is essential that you model it several times first. Let your students see how the technique works in practise, in the context of a genuine problem that has been encountered during a lesson. After a few supported attempts, encourage students to go off and use the procedure independently. Put good examples on itslearning, so they can see what a successful one looks like.
       
    6. Refusing to help
      Although it may seem at odds with your role as a teacher, refusing to help students can be a powerful strategy for encouraging independence. For example, try refusing to help students until they can show you that they have made three attempts to solve their problem on their own. If they are still stuck after this, ask them to talk you through their attempts, so that you can explain how to solve a similar problem in the future, as well as helping with the current one.
       
    7. Live marking
      You can help students to become more independent and more aware of the quality of their work by asking them to make improvements when they believe that they have finished. If you are in the good habit of setting the students some independent work in each lesson, then get around the classroom as much as possible with your green pen and give them some extension work and specific feedback to them, which helps their thinking further. If you see a good piece of work or something that you want to highlight to the whole class, take a photo and add it to the itslearning plan, so all students can access while you continue to walk around. Another option is to put on the visualiser and give some whole class feedback, take a picture through the visualiser and then add to itslearning.
       

    As per usual, if you have any feedback or tips that you have tried to promote independence in your classrooms, I would love to hear about it, so I can share with others.

    Read More
  • December Blog 2021

    Published 07/01/22, by James Collins

    This month the guest editor is Vicci Masson, who has written our teaching and learning blog on the advantages of using dual coding to support all students, but in particular our SEN students. I know the Humanities departments have been trialling this and have found it extremely useful, and the student feedback has also been very positive. Vicci has focussed this blog on supporting revision, as we are now in the run-up to the summer exams, I think this is good timing for us to consider how we can use this to support our students. Over to you Vicci…

    In History this year we have had a bit of a revelation.  While we want to stretch and challenge all our students, so they can make the greatest progress we don’t want to hamper our athletes before they have even started the race by giving them tools that will not help them get to their end goal.  With a very high percentage of our Year 11 students with SEN support this year, this is a very important time for us to review our practice and improve our provision for revision.

    Knowledge organisers

    Our existing knowledge organisers were content heavy and while they would support our level 7-9 students and challenge our level 5-6 students, they would not be helpful for our students in the low attaining band. Those with a target grade of a 4 or below would struggle with the level of literacy (example below)

    Having attended an Eduqas webinar in October that focused on a school in a similar setting to Crookhorn, I was interested to see how they used knowledge organisers differently. 

    They advised designing knowledge organisers following the principles of dual coding.  These were not to then be filed away or sent home with students to never again see the light of day! Each knowledge organiser was handed out at the start of the topic and stuck into the student book.  The images used in the knowledge organiser were then used in every ‘Do Now’ activity, so that students became used to using them as an information source.   


    Research by Mayer and Anderson in 1991 found that when verbal information was presented alongside relevant images, it became much more memorable.  Therefore, having the images shown on the board or in the student’s book while they complete a piece of work mean that the cognitive load facing the student is reduced, allowing them to more easily complete the task in hand.

    If our brains work best when information comes in more than one format, then the repeated use of these simplistic images over a series of lessons should aid working memory and ultimately lead to greater progress being made.

    We have used these in our revision programme and already this year there has been a pleasing response from year 11.  Students are using the resources in a meaningful way.  The use of a visual representation gives them something to hook their learning to but more so, the over learning and repetition of using the knowledge organiser each lesson has afforded students a new-found confidence to respond to targeted questioning and cold calling. 

    This is a tactic that we plan to cascade down to KS3.  Not only will this prepare our students to work similarly at GCSE, it would seem foolish to not use current research in our pedagogy for KS3 as well as KS4. In year 8 will be trialling the use of knowledge organisers that use black and white images from the noun project. 

    This website is a useful resource that is a one-stop shop for simplistic black and white images.

    https://thenounproject.com/

    Please find below another example that we have recently used.


    Read More
  • November Blog 2021

    Published 09/12/21, by James Collins

    Checking that our students have understood what we are teaching a is a key part of our Assessment policy. Doing so regularly, in a meaningful way, will then inform a teacher of how to adapt future planning to address misconceptions.

    As classroom teachers we have many techniques we can use to check understanding. In the next few pages, we will refresh our thoughts on the most common of these and look at how we can extend the use of technology to get a true understanding of what our students have learnt, rather than what we have taught them.


    Mini Whiteboards

    A staple of some classrooms and used in many ways. Writing an answer and holding it up is probably the most obvious use, but how can we go beyond this?

    A while back I found this article: https://thegoldfishbowl.edublogs.org/2015/11/29/mini-whiteboards/

    Although a few years old, Miller’s comments are still valid for our lessons today.

    Whiteboards are a way of getting immediate feedback about student understanding, with an effective sequence always starting with a well-designed task or question. Rather than just waiting as students write, this time can be used to seek the most useful responses. Do most students get it or not? Where are the great examples that can be used as models? Where are the examples of common errors that students can learn from? Which students are making the same errors?

    …One of the issues that we have, as I am sure many schools do, is the use of unnecessary fillers in spoken responses. [Due to a] lack of confidence in what they are saying. Or that they don’t know what they are going to say before they start saying it. The few seconds it takes to write a couple of ideas down on a whiteboard can help to eliminate both of these. 

    Miller talks about this well question. These are an integral part of our planning on itslearning, and we should see this in the key question's section of the plan.

    Miller goes on to discuss what can then be done with the responses seen and how lessons can be adapted accordingly.

    Going beyond this, rather than just letting whiteboard responses be one-off instant feedback to you, you can record general perceptions and misconceptions in the review notes of the plan for development when reviewing the topic before the next time you deliver. This idea of recording general thoughts can apply to our questioning of the students too.


    Self-marking tests

    Whichever platform we use, self-marking tests have huge benefits on teacher workload and meaningful analysis of results.

    Some of the best tests I have seen staff use are the simplest. Succinct questions with multi choice answers. Really think about what it is you need the students to understand and focus down to that. When used for homework, there is no need to fill a particular time frame with extra questions – if you can gauge understanding in 10 questions taking less than a minute each, then why add anything else

    There are currently two test versions in itslearning.  The itslearning development team have released the new version, however this still has some limitations, and some staff prefer using the older version.  There are no plans yet to remove the older version, and old tests can be easily converted to a new once it is functioning fully:

    When creating self-marking tests, please consider the following questions as options:

    Fill in the blanks – take a section of text (copy for an electronic resource or type in yourself), highlight the keywords to demonstrate understanding – done!

    This type of question has variations:

    • Just selecting the word means the students have to get the correct spelling, there are options for adding in common misspellings, so the students get the marks if they spell it a different way.
    • There is also the option for marks to be awarded if students use the correct capitalisation.

    Select from a list – very similar to the above, but students will be offered a list to choose from, as well as the words highlighted in the text, you can add in extra words to make the students think harder.

    Differentiation opportunity – please consider the option of creating two versions of the above.  If you create one homework with the ‘Fill in the blanks’ and one ‘Select from a list’ then you can allocate accordingly to the class.

    Spelling tests – for those subjects that need keywords spelt correctly, we can use a self-marking test as a tool for independent practice (Yes, I know we have no control over them googling the answers, but we never do with homework.)  Building the opportunity for them to independently try is always good.  You will obviously need to design a way that you can ask them to type a particular work without typing it yourself so do consider the option for recording audio files in the questions.

    Support sheets:

    Setting up
    Selecting from a link and fill in the blanks


    Examples seen recently:

    English – 10 questions

    Science – A CFU test set, with support videos if needed.  This test has been left open for as many attempts as they want, so students can independently aim for improved scores.  With a test open like this, you could attach the same test to a revision plan later in the year.

    • Currently, only old tests can be accessed after the deadline.  The workaround for this on the new test would be to keep the original deadline and then change to a later date in the year for the revision session.

    Differentiation opportunities – could the videos be in a ‘support’ CFU that is targeted at key students through the permission settings?  Could you ‘copy’ this test having created it, and add in some challenge questions at the end and then target to you higher attaining students. 


    Matrix (survey question)

    We’ve all had students in our classes that just don’t seem to get it: even though they are getting the answer right, they can’t tell you why.  It is therefore key that we know what level the students believe their own understanding is at.

    A matrix question is a grid question where students can rate their confidence options for various questions.  The below example is set up with RAG options for five photography techniques.  These questions can be completely tailored to you – there are various other options, as well as how the results will come out to you on the support sheet.

    Support sheet:

    Matrix questions

    There are many more ways that itslearning can support our checking for students understanding.  Kate Humby is now fully training on how to create resources and support your curriculum.  Through the Spring term she will be working with Heads of Subject offering her support.  Please do contact her if you’d like her to create a resource for you, or you would like some specific training, so you can create these resources for yourself.

    Read More
  • October 2021 Blog

    Published 09/12/21, by James Collins

    Our Literacy plan is a simple three strand approach based on what we consider to be Crookhorn’s biggest areas of need: increasing the engagement with and enjoyment of reading, oracy and the mechanics of writing.

    DEAR Time and why it counts.

    DEAR Time allows us to expose the lower years to a range of texts, to give them space to share their ideas verbally as well as to listen to the opinions of others. By asking open questions we encourage the students to think and, more importantly, respond by explaining their thinking using because/but/so sentences.

    Example question: ‘What do you think we could do to help plastic pollution?’
    Student response: I think we could reduce plastic pollution by recycling because it is better to reuse than to make new.
    I think we could reduce plastic pollution by recycling but we need to stop buying it in the first place.
    I think we could reduce plastic pollution by recycling so we can all help do our bit.

    From Autumn 2 we will be starting the class reads during DEAR Time where teachers follow the schedule and read the allocated pages. The updated versions can be found on the Literacy page in Staff Resources: https://crookhorncollege.itslearning.com/ContentArea/ContentArea.aspx?LocationID=65&LocationType=1

    • Year 7 – Pax
    • Year 8 – Cirque du Freak
    • Year 9 – The Extinction Files

    Oracy – the importance of dialogue.

    Oracy is a term first coined in the 1960s by Andrew Wilkinson and focuses on the ability to express yourself fluently in speech. We want to use dialogue to help students develop their understanding through consistent and meaningful dialogue; listening and responding appropriately, sharing opinions and demonstrating their knowledge.

    The 5 step method, Robin Alexander (2008)

    1. Rote – transmit knowledge to students by repeating ideas.
    2. Recitation – targeted questions to test knowledge, progress and recall.
    3. Instruction – tell students what to do and explain key ideas.
    4. Discussion – encourage exchange of ideas and information.
    5. Dialogue – structured questions and discussion to deepen understanding.

    Oral rehearsal builds confidence and helps remove the fear of committing the wrong thing to paper which can be an obstacle to writing. Think-Pair-Share can be an excellent tool as it encourages students to listen to teacher input and then discuss their answers with a partner before group/class feedback to check for misunderstanding or writing down their rehearsed answer. Once students are confident and adept at doing this, we can then introduce this in a wider classroom setting. Sentence stems can be a helpful way to scaffold this structured discussion:


    Allowing students the time and freedom to talk to one another can feel uncomfortable at first as it puts the onus on them to stay on task and focused but if we circulate and transition into the role of facilitator, we promote oracy and independence.

    The Mechanics of Writing

    These are the building blocks of success. Historically, our students have struggled with longer answer questions that require them to organise their ideas in a coherent and concise way with focus on the keywords of the question.

    For many subjects, students are expected to support or justify their ideas which is where conjunctions become an important tool. Please look at the example from Technology:


    Technology

    Using conjunctions

    Because     –    But     -      So


    Conjunctions like ‘because’, ‘but’ and ‘so’ let you explain your ideas in more detail to help you get the higher marks by showing what you know.

    Stainless steel grade 304 is used for the pivot screw because it is naturally corrosion resistant so will not rust.

    Stainless steel grade 304 is used for the pivot screw but if it was a marine environment, we would use 316 as this resists corrosion in salt water.

    We use stainless steel in the manufacture of pivot bolts so that we do not need an additional surface finish.


    Alongside promoting conjunctions to explore ideas, we are continuing to focus on the basics for punctuation – capital letters and full stops – to instil the importance of accuracy and proof-reading. Consistency is key to success and can be a simple addition to your marking; capital letters for names or starts of sentences are easy to spot and highlight during live marking. I will be undertaking several learning walks this half-term to monitor the impact of our marking focus. Please find the help sheet attached.

    Thank you to the staff who have started to embed Literacy in their practice. If you would like further guidance or have any queries or concerns, please don’t hesitate to contact me.

    Read More

Page 2